
Hello everyone! We have discussed everything in detail about Hook vs Slice in this article, causes, fixes and pro tips at the end. But, before we dive into the details of Hook Vs Slice, we want to share with you a fascinating fix we discovered for the slice that you might not have come across in any other blogs out there. We call this fascinating fix “The Crossed Feet Drill”, it will definitely help you with correcting your slice. While you may have heard this before, but we will discuss it in a way that you will undoubtedly find unique and insightful.
The Crossed Feet Drill
This drill involves crossing your feet at address, which might sound unconventional, but it can help correct a slice by encouraging the correct swing path and promoting better body rotation.
Here’s how you can do it:
Take Your Stance: Set up to the ball as you would normally, but before doing so, cross your front foot (left foot for right-handed golfers) over your back foot (right foot for right-handed golfers).
Closed Stance: Your front foot should now be closer to the target than your back foot, creating a “closed” stance. Make sure your shoulders are aligned with your feet.
Practice Swings: Take some practice swings with this crossed feet stance. Focus on swinging the club along your body’s natural rotation, allowing the club to move from the inside-to-outside path.
Feel the Release: As you swing, concentrate on releasing the club smoothly through the impact zone, trying to square the clubface with the ball. The crossed feet position will help encourage the proper body rotation and release, minimizing the slice spin.
Hit Balls: Once you feel comfortable with the drill, try hitting some balls with the crossed feet stance. Start with shorter, controlled shots before gradually building up to full swings.
Remember, this drill is meant to be an exaggerated training aid to help you feel the correct swing path and release. After practicing with the crossed feet stance, you can gradually return to a normal stance and integrate the new sensations into your regular swing. The goal is to train your body to rotate properly and square the clubface at impact, reducing the slice tendency.
It has worked for me and I am sure that it will work for you too. What you have to do is give it a chance! So, I hope you will try this. And let me know in the comment section if it worked for you or not. Now, let’s discuss our main topic Hook Vs Slice.
Hook Vs Slice
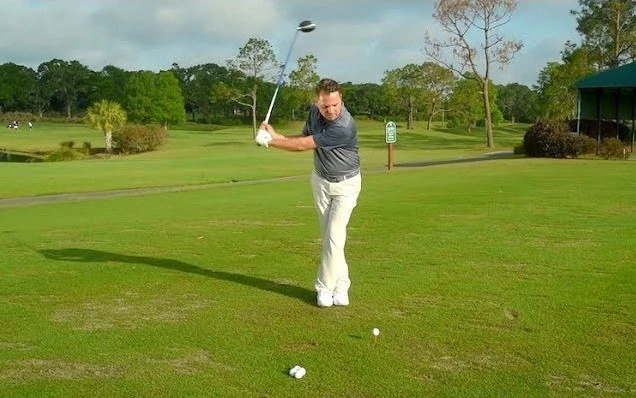
A hook and a slice are two of the most common ball flights that can really mess with your game if you are not careful. But don’t worry, I’ve seen it all and can help you out.
Now, a hook, that’s when the ball starts straight or even a bit to the right (for a right-handed golfer like me), but then it takes a sharp turn to the left in the air. It’s caused by excessive rotation of the hands and wrists through impact. You have to watch out for that, ’cause it can lead to trouble if you’re not aiming properly.
On the other hand, we got the slice, and that’s when the ball starts straight or a bit to the left (for a righty like me), but then it curves way off to the right in the air. This one’s usually caused by an open clubface at impact and not enough body rotation through the shot.
Now, let’s discuss their club path and club face because If we know how they work together then we will be able to fix hooking or slicing.
Understanding the Basics: Club Path and Club Face
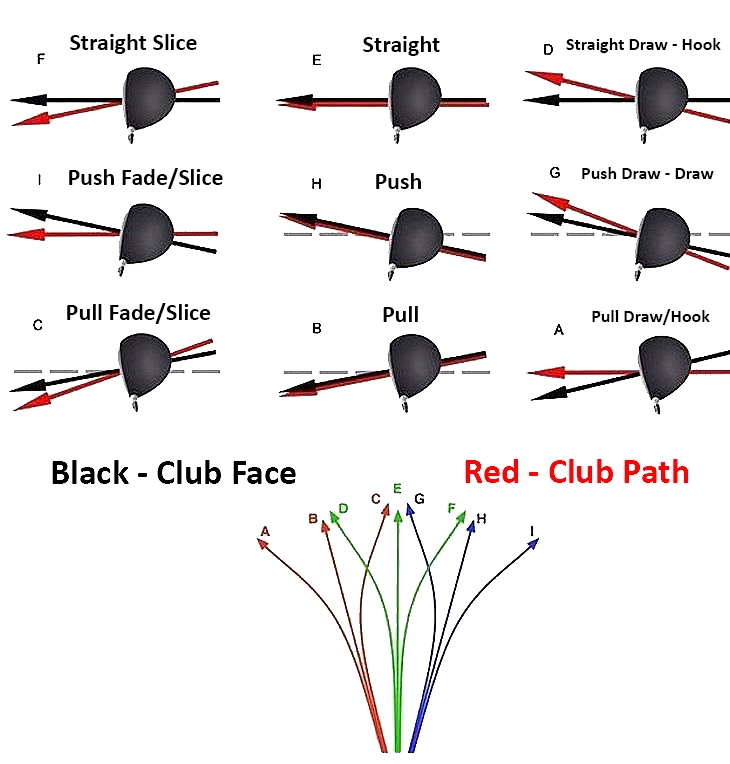
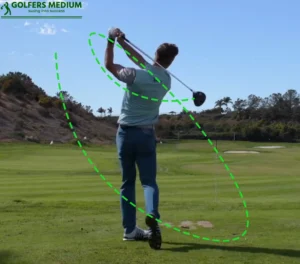
Club Path: The club path refers to the direction the clubhead travels during your swing. It can be either inside-to-out or outside-to-in relative to the target line. An inside-to-out path tends to produce draws and hooks, while an outside-to-in path leads to fades and slices.
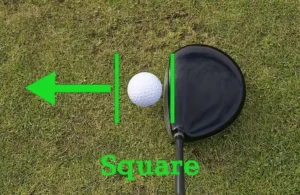
Club Face: The club face is the angle of the clubhead at impact with the ball. It can be open (pointing right of the target), closed (pointing left of the target), or square (pointing at the target). The club face’s orientation influences the spin applied to the ball, determining whether it curves left (hook or draw), right (slice or fade), or flies straight.
Hook Vs Draw Shots – Causes and Fixes
Hook and draw shots curve from right to left (for right-handed golfers) but differ in their specific ball flight patterns and how they occur.
A hook happens when the club path swings from inside-to-out, while the club face is closed relative to the path at impact. This combination imparts significant backspin, causing the ball to curve dramatically from right to left.
Whereas, a draw occurs when the club path swings slightly from inside-to-out, while the club face is also closed, but to a lesser degree than in a hook. And the ball’s landing looks almost like a straight line from where you are standing.
Main Causes of Hook
Hook is not that common among beginners. That’s why it is often said that, “Hook is a good player problem”. Advanced golfers may occasionally overcorrect their swing in an attempt to fix other ball flight issues. For example, trying to avoid a slice, they might unintentionally close the clubface too much, resulting in a hook.
Swings are intricate and rely on precise timing. Even minor timing discrepancies can lead to the clubface closing too quickly at impact, causing a hook.
Moreover, experiment with grip changes or adjustments to grip pressure can lead to unintended clubface control issues which results in a hook. I have discussed proper golf grip here.
Certain golfers have a unique release pattern that can promote a hooking ball flight, especially if they rely on a later release of the clubhead.
Now, let’s see how to fix it.
Fix Hook
Step 1 – Grip Adjustment
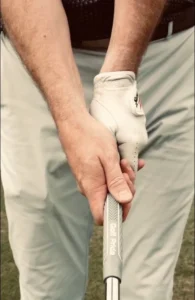
First and foremost, make sure your grip is correct. Hold the club in your fingers, not your palms. The “V” formed by your thumb and forefinger of both hands should point towards your right shoulder (for right-handed golfers). This will help you gain more control over the clubface during the swing.
Step 2 – Stance and Alignment

Check your stance and alignment. Your feet should be shoulder-width apart, and your toes should be slightly flared out. Aim your clubface at the target, and align your body parallel to the target line.
Step 3 – Balance and Posture

Maintain good balance and posture throughout your swing. Flex your knees slightly, keep your back straight, and tilt from your hips. Avoid hunching over the ball or leaning back during the swing.
Step 4 – Backswing
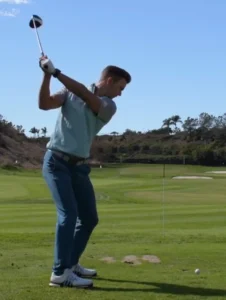
During the backswing, focus on keeping your hands and arms in sync with your body rotation. Avoid swinging the club too far inside or outside the target line. A controlled and balanced backswing is crucial to setting up a solid downswing.
Step 5 – Downswing and Release
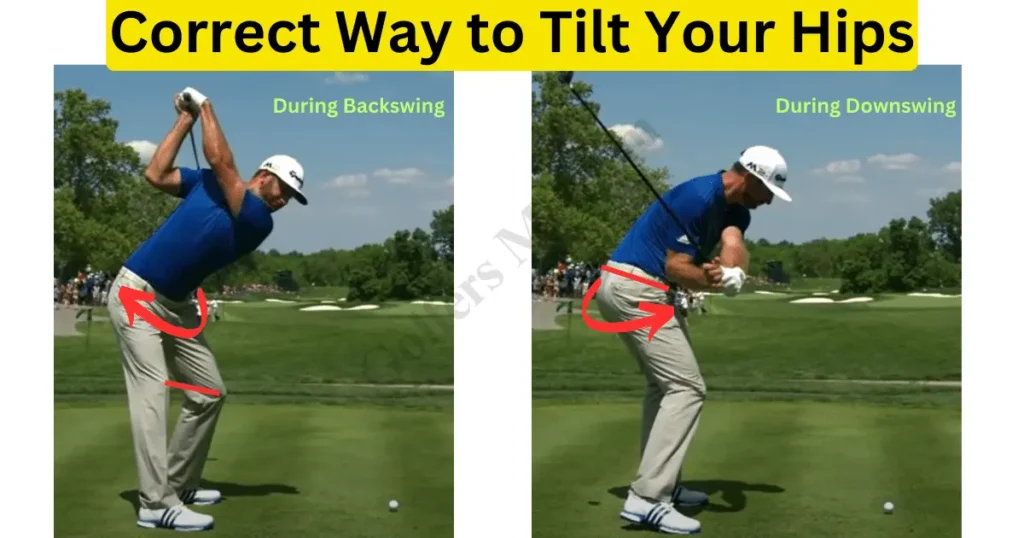
As you start your downswing, try to initiate the movement from your lower body. Your hips should rotate toward the target before your upper body and arms. This sequencing will help you deliver the club to the ball with more power and control.
Step 6 – Clubface Control
One of the main reasons for a hook is an open clubface at impact. Work on squaring the clubface to the target at impact. To feel this, practice swinging with your hands slightly ahead of the clubhead at impact. This helps prevent the clubface from closing too soon.
Main Causes of Slice
Slices are more common and technically easier for beginners to produce compared to hooks. This is because beginners often tend to create conditions that lead to a slice – such as having a body that is under-rotated with a face drastically open to the target and swing path.
After years of golfing, I’ve observed two common issues among golfers. Firstly, a significant number of players seem to overlook the importance of leading with their hips during their swing. Instead, they rely mainly on their upper body and arms, resulting in an open face and a tendency to push the ball.
Secondly, many golfers find it more effortless to swing over the top and follow an out-to-in path, leading to fades or slices.
Now, the main question is how can we fix it? So, I have shared a new technique above which you have heard already: “The Crossed Feet Drill”. If this doesn’t work for you then follow these next steps.
Fix Slice
Step 1 – Fix Club Face
The clubface’s position at impact plays a significant role in determining the ball’s initial direction. A square clubface at impact means the clubface is pointing directly at the target. An open clubface, on the other hand, points to the right of the target, causing a slice.
To work on the clubface position:
Alignment Stick Drill: Place an alignment stick or golf club on the ground, parallel to your target line. At the range, practice hitting balls, making sure your clubface aligns with the stick at impact.
Slow Motion Swings: Perform slow-motion swings in front of a mirror or record your swing on video. Focus on keeping the clubface square at impact.
Step 2 – Fix Club Path
A slice is often a result of an over-the-top club path, where the club comes outside-in through impact. This outside-in path promotes side spin, leading to the ball slicing to the right (for right-handed golfers).
To improve your club path:
Inside-Out Swing: Work on swinging from the inside to the ball. Imagine a path that goes from slightly behind your body and approaches the ball from the inside. This helps to reduce the slice spin.
Alignment Stick Drill: Place an alignment stick or two along the target line. Create a path that is slightly inside the sticks on your downswing, promoting an inside-out swing.
Step 3 – Grip it Right
Ensure a neutral grip that allows for a more controlled clubface through impact. Make sure your grip is firm but not too tight. Imagine you’re holding a baby bird – you don’t want to crush it, but you don’t want it to fly away either.
Step 4 – Stance and Alignment
Square up your feet, hips, and shoulders to the target. That means pointing everything straight ahead, not off to the side like you’re trying to hit the ball to the next county.
Step 5 – Keep Your Eye on the Ball
“Keep Your Eye on the Ball”, Tiger Woods always says this, and it’s for a reason. Don’t be peeking to see where the ball is going before you even hit it. Focus on making solid contact.
Step 6 – Swing Smooth and Easy
Don’t try to kill the ball, that’s a recipe for disaster. Take a smooth, controlled swing – like you’re swinging a 7-iron, not a sledgehammer.
Step 7 – Stay Balanced
Don’t let yourself fall all over the place after your swing. Hold that finish and make sure you’re steady on your feet.
Step 8 – Avoid Over-the-Top
One common cause of a slice is an over-the-top swing. Try to feel like you’re bringing the club down from the inside, not over the top like you’re chopping wood.
Step 9 – Release the Club
Allow your hands to release naturally through the ball. Don’t hold onto that club like it’s a lifeline, let it do its job.
Final Tips to Fix Your Slice and Hook
Identify Your Club Face Impact Point
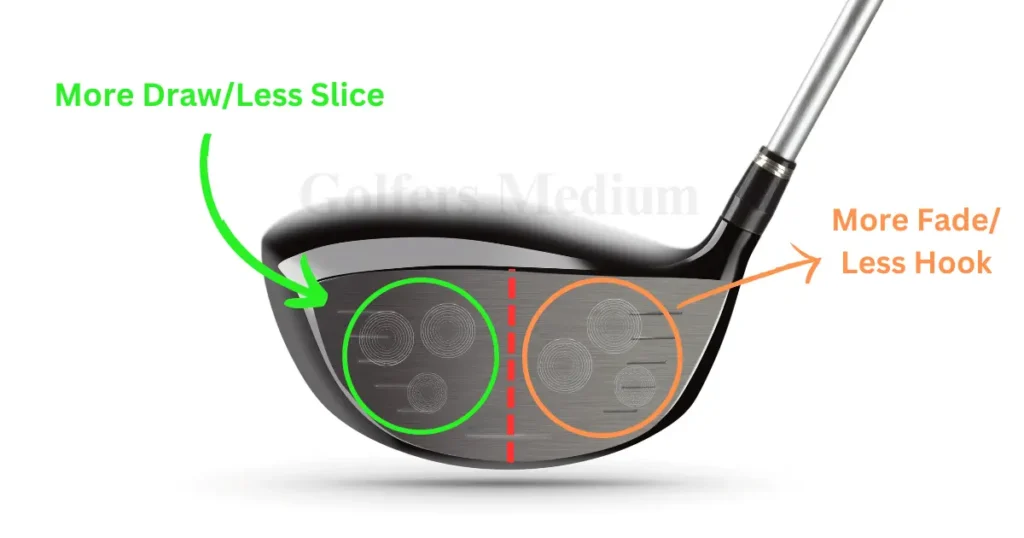
Using face tape or impact spray is an excellent way to gain valuable insights into your ball-striking technique. When you apply face tape or impact spray to your clubface, it creates a visible mark upon contact with the golf ball. These marks can reveal essential information about your swing, such as the location and consistency of your impact.
If you are slicing, the impact mark on the face tape or impact spray will typically be closer to the heel of the clubface (Orange zone in the image). This means that you are making contact with the ball on the part of the clubface farthest from the club’s shaft.
To reduce slicing, you may need to work on squaring the clubface at impact and/or adjusting your swing path to be more in-to-out.
If you are hooking, the impact mark on the face tape or impact spray will generally be closer to the toe of the clubface (Green zone in the image). This indicates that you are striking the ball on the part of the clubface farthest from the club’s hosel.
To reduce hooking, you might need to work on squaring the clubface and/or adjusting your swing path to be more out-to-in.
Align Your Shoulders Correctly at Address
Well, you know, as a right-handed player, it’s crucial to pay attention to your shoulder alignment at address. If that imaginary line formed by your shoulders points to the right of your target, you’re practically begging for that dreaded “inside to out” swing path, leading to those pesky hooks. And believe me, we don’t want that!
On the other hand, if that line points to the left of your target, you’re setting yourself up for an “open” stance, and trust me, that’s going to force an “outside to in” swing path, resulting in a frustrating slice that we all try to avoid.
So, my final advice to you is to find that sweet spot where your shoulders align just right with the target. It’s all about finding that balance and getting that perfect swing path to improve your game.
FAQ
Why is a Slice way more common than a Hook?
I think it’s a natural progression. I have seen most golfers start with a slice. Then they overcorrect slices and hit hooks.
Another two things I noticed after years of golfing – firstly, many are unaware of the importance of leading with their hips during the swing. Instead, they rely excessively on their upper body and arms, leading to an open clubface and pushing the ball.
Secondly, a prevalent mistake is the tendency to swing over the top, resulting in an out-to-in swing path that causes a fade or slice. Occasionally, some golfers manage to trap hook the ball by getting their wrists over at impact, but this is less common.
Is it easier to fix a hook or a slice?
Fixing a hook is easier than fixing a slice. Anybody who fixed his/her slice has done 90% of the work. So, it’s easy for them to fix that hook easily. Of course with practice.
Helpful Related Article

Also See

Hi! I am Hannah, a golf enthusiast, have been perfecting my swing for over a decade, making long putts a breeze. Aside from playing, I am a professional golf writer, I try capture the nuances of the game and inspire others to embrace their love for golf. Follow me on Twitter.